 If you’ve just bought yourself a shiny new Apple Mac computer, you’re probably wondering “How do I use it? Is it anything like Windows?” By and large, you’ll find that the Mac OS X operating system shares a lot of similarities with Windows – all the basic conventions like icons, desktop, shortcuts (Apple calls them “aliases”), windows, menus, Trash, etc. all work pretty much the same.
However, Mac OS X also has its own distinct personality quirks & features. The current version of the operating system – 10.4, also known as “Tiger” – was released in April 2005. Its standout features are listed here:
- Spotlight
- Dock
- Sidebar
- Smart Folders
- Expose
- Dashboard
Welcome to Part 2 of our Beginners’ guide to the Mac OS X “Tiger” operating system! In Part 1, we looked at Spotlight, the system-wide search feature, and the handy Dock and sidebar. Now we look at Smart Folders, and two pretty nifty screen features.
Smart Folders
 You may have already seen a similar concept in iTunes, known as Smart Playlists. Well, Apple took the concept beyond iTunes and made it a standard part of the Mac system. Smart Folders are actually an extension of Spotlight (see Part 1) – basically they’re Saved Searches.
To create one, just select ‘New Smart Folder’ from the File menu, feed it some criteria (eg. “All Word Documents on the Computer created in the last 30 days”), and click the ‘Save’ button. This creates a purple folder which fills with the names of all the files from anywhere in your system that meet the criteria you specified.
A similar feature exists on Windows Vista, called ‘Virtual Folders’, which works on the same principle. Both are an excellent way of organising your files!
Exposé Exposé is a truly nifty way of managing a whole lot of open windows, cutting through the clutter and letting you jump straight to the window you want, or just hiding them altogether. Trust me, you won’t want to go back once you’ve tried it!
(Incidentally, Microsoft introduced a similar feature in Vista called Flip3D, but I’m going to be a little biased here and say that Apple does a much better job of it).
To use it, you just press F9, F10 or F11.
F9 will take every window you’ve got open in every program and lay them out so you can see them all side-by-side (see picture). Just click on the one you want, and it will jump you straight there.
F10 does the same thing, but only for the program you’re currently in.
F11 moves all windows out of the way so you can see your desktop.
You can customise the way Exposé works by going to Apple Menu > System Preferences > Dashboard & Exposé. For example, if you don’t like having to reach for the keyboard every time, you can have Exposé activate when you, say, move the mouse into a corner or if you press the middle mouse button.
Dashboard
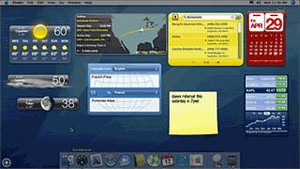 Dashboard gives you access to a whole bunch of mini-programs called ‘Widgets’. There are widgets for all sorts of things like Weather, Stock Quotes, Unit Conversions, Calculators and heaps more.
Basically, this is Apple’s implementation of an idea that was kick-started by a shareware program called Konfabulator (which Yahoo! later bought from its authors, rebadged ‘Yahoo! Widgets’ and is now a free download from Yahoo’s website).
It works a bit differently from Windows Vista’s Gadgets and Yahoo’s Widgets in that Dashboard widgets don’t constantly remain on the desktop – rather, they stay hidden away until you need them. Just press a key (F12) to summon them, then press it again to dismiss them.
To customise your Dashboard, press F12 and then click the little + sign at the bottom left of the screen. You will then be presented with a collection of widgets – just drag the ones you want onto the screen. You can even put more than one instance of the same widget onscreen (for example, one copy of the Weather widget for Sydney, and one for London).
Each widget has a little ‘i’ in the bottom corner. Click it and you can access that widget’s settings.
My personal Dashboard contains widgets for quick post-it notes, Wikipedia searching, and a regular selection of the daily comics; so I’ve personally been finding it handy
That ends our introductory article on Mac OS X’s main features – we hope you’ve found it useful. Please stick around and check out some of our other articles at Inspect My Gadget.