 One of the highlights for me when Inspect My Gadget upgraded to Windows Vista was that I could now check out Windows Mobile Device Center 6(WMDC) which is Vistas replacement for ActiveSync. While Activesync worked alright and did the job it was designed to do, the interface is old and it was time that Microsoft made an improvement. They have come out with WMDC for Vista which looks after all the synchronising of our Pocket PC/Smartphone with our computer. It offers us a nice new user interface which is easier to navigate, and a few extra features. WMDC replaces ActiveSync and does not currently run on older operating systems.
This article will guide you through all the options and features WMDC offers us. It is fairly easy to use and setup compared to ActiveSync, but at Inspect My Gadget, we want to get the most out of it, and this means looking at each and every feature individually.
This article is designed to guide newcomers through the Windows Mobile world. It does not cover much troubleshooting, as this is covered in my article “How-to: connect your WM5 device to WMDC via Bluetooth”. If you are having problems connecting your device, please check out this article as it has solutions for all the problems I have come across.
What you need (if you want to play with WMDC):
- Windows Vista
- I will be using the Ultimate version
- A Windows Mobile Pocket PC or Smartphone, 2003 or newer
- For this guide, I will be using an HP Ipaq rw6828
- Windows Mobile Device Center
- This is a free download from Microsoft, available here
- Outlook 2003 or later for email/calendar/tasks sync
- Windows Mail and Calendar are not supported
Straight into it! :
The opening screen:
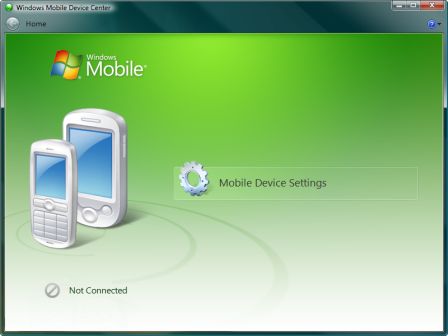
There is not much to see here. There is no device currently connected. You have the option to go into “Mobile Device Settings” in which you can alter your “Connection Settings”. There is no need to adjust this yet as the defaults will get you going. This will always be available to you. I will run through it towards the end of this article.
Connect your device:

Once you plug your device in via USB, your screen will gradually change to the screen shot you see above. It takes a little time on the first go, as drivers for your device need to be installed and to prepare your computer for the fun we are about to have. Most importantly, you should see that it says “Connected” on the bottom left of the screen.
If you want to connect via Bluetooth or Infra Red in the future, it is necessary to connect via USB initially, to create the partnership.
You are presented with two options on this page.
-
Set up your device
This option allows you to setup your device much the same as you might have done with ActiveSync. It allows you to use all the features that WMDC offers. This is the option you will want to select if you want to synchronise your Outlook information. This option allows you to set up a partnership. You would most likely use this option if you are connecting to your own computer. -
Connect without setting up your device
This is similar to ActiveSyncs guest feature. It allows you to view files on your device, extract pictures and install programs but it does not allow you to synchronise your Outlook data. This option does not allow you to create a partnership initially. You would most likely use this option if you are using someone elses computer or synchronising directly with an Exchange Server.
Either of these options can be changed at a later stage, you would want to be careful synchronising your data with someone elses machine as you may wipe some of their data, or worse, give them all your phone contacts and calendar appointments which would be a pain to remove later.
As all of the options available in “Connect without setting up your device” are available in “Set up your device” we will select the first and create a partnership. Choosing the latter bypasses this step.
Select items to Sync
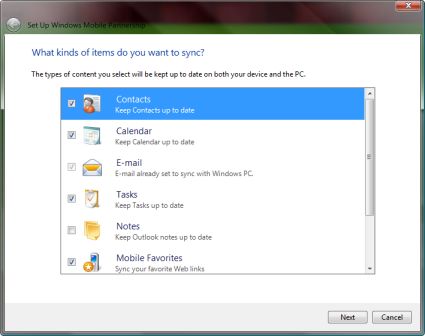
This window allows you select which possible items you want to sync with your device. The list contains the following options from Outlook:
-
Contacts
-
Calendar
-
E-mail
-
Tasks
-
Notes
You can also include Mobile Favorites and Files. There is nothing new here. It is the same options that ActiveSync offered. The defaults are generaly fine for most scenarios so don’t get too bogged down in this. You can always leave most of the boxes unticked and then tick them in the future as you require them.
When done, Click “Next”
Name your Device
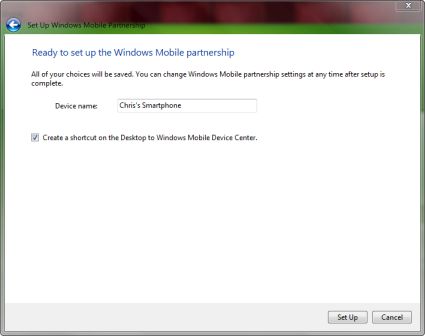
I am not sure why we are given this option as our mobile devices already have a name. This is a little neater and is more of a name for the partnership. Call this what you want but it is nice to keep it simple such as the default. When WMDC opened, it called my Pocket PC, “Chris’s Smartphone”. It works fine for me and I have no need to change it.
When done, click “set up”
Your computer will now setup your partnership and proceed to sync your Outlook data with your mobile device.
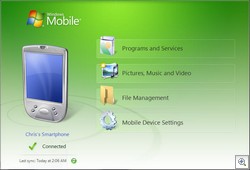
The main window
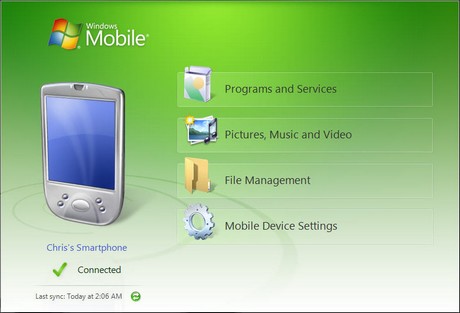
It does not matter if you have chosen to create a partnership or not. This window is the same for both options. The only difference is an option to change what Outlook data you would like to sync.
We will now go through each of the options on this page.

Programs and Services contains only one option initially and this is a link to a Microsoft Website. It could come in useful though, it is titled “Get updates, downloads, help and more…”.
There is also a “>>more” option below it which will give you access to “Add/Remove programs”.
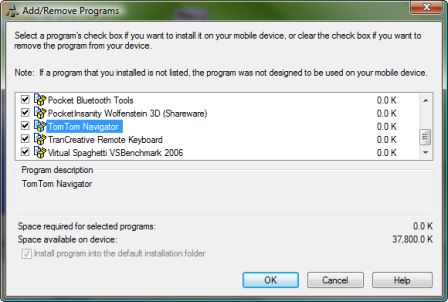
This window shows what software has been installed on your device. You can untick boxes to uninstall software or tick a box to reinstall it, as long as the software was initially installed from the current machine.
Usually when installing Pocket PC software, you run a windows installer which automatically opens this window and adds the program to your list. That is why there is no Add button here.
When done, click “OK”
 Pictures, Music and Video is a nice new function of WMDC. It was possible to do all these functions in Windows Explorer in XP, but it was not as tidy and required much more effort from the user.
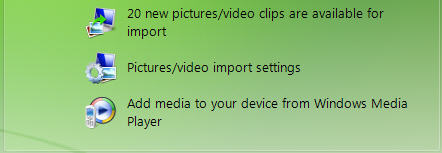
The first point, “(x number) new pictures/video clips are available for import” tells you how many pictures and videos you have on your device, and secondly when you click on it, will transfer all your pictures and videos over to your computer.
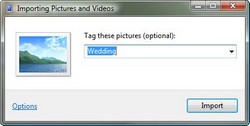
Depending on your settings (listed below), you will be prompted to “tag” your pictures allowing you to easily find them later using Windows in-built search facility.
The options button on this page will direct you to the “Import Settings” below.
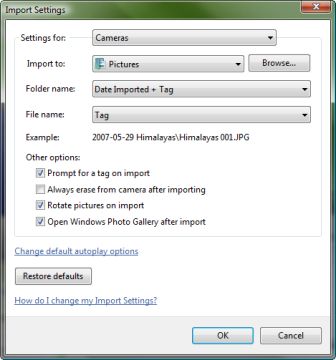 “Pictures/video import settings” is not part of WMDC but rather Windows itself. You have the option to change settings but luckily the defaults are fairly suitable.
It’s handy having this option here though as to get to these options through Windows Photo Manager takes a fair few steps. Click “File”, Options” and click on the “import” tab.
 “Add media to your device from Windows Media Player” opens up Windows Media Player, with the sync tab selected. This allows you to drag music from your music library onto your device.
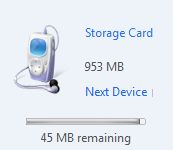
The image on the right shows your device and by clicking “Next Device” you can select various Storage Cards.
I realise this isn’t part of WMDC either but it is more interesting than tagging pixelated pictures of the neighbours dog.

File Management is a shortcut to Windows Explorer showing you the contents of your device.

This can also be accessed by going into Windows Explorer and selecting your mobile device. You see a graphical representation of how much space is available on each storage card and your phone’s internal memory.

 Mobile Device Settings lets us view and change all the sync settings. We will rarely need to go in here once the device is set up, but it is good to have a look at it now so we know what we are able to do.
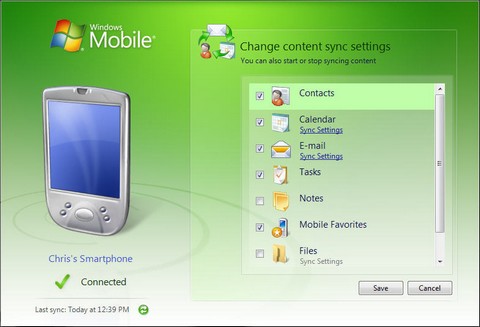
Change content sync settings: You will only see this option if you have previously created a partnership with your mobile device. This gives us a few extra options for each component we want to sync. We get to these by clicking on sync settings for each item.
![Calsync]() Calendar sync settings: If you have chosen to sync your calendar with your pocket PC/smartphone, you will get all future appointments from outlook on your device. This window lets you choose how long past information will be stored on your device. I set mine to keep one months data but then find I rarely need to go back and look at it.
Calendar sync settings: If you have chosen to sync your calendar with your pocket PC/smartphone, you will get all future appointments from outlook on your device. This window lets you choose how long past information will be stored on your device. I set mine to keep one months data but then find I rarely need to go back and look at it.
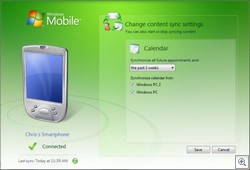
If you are syncing between multiple computers, you are able to select which computers you want to sync this type of data with. Keeping both synced can be a great way to keep multiple computers up to date, resulting in the same data on both computers.
-
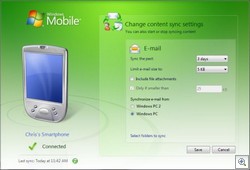
![Email settings]() Email sync settings: You can configure what mail gets stored on your device. The default is to give you the last 3 days mail. This is generally quite a good figure. If you set the number too high, you run the risk of your device running slow as there is not enough free memory, or if the number isn’t high enough, there’s no point using the feature. This will depend on how much mail you get each day.
Email sync settings: You can configure what mail gets stored on your device. The default is to give you the last 3 days mail. This is generally quite a good figure. If you set the number too high, you run the risk of your device running slow as there is not enough free memory, or if the number isn’t high enough, there’s no point using the feature. This will depend on how much mail you get each day.
Limit e-mail size lets you filter out larger messages you have received, to preserve your memory space on the device. A standard text email will rarely be as large as 5KB but emails with fancy backgrounds or signatures and the like can easily be larger than this. If you are unsure, start at 5KB and work your way up if you are not getting particular mail.
Include file attachments lets you sync email attachments with your computer. This is a great way to clog up your device with junk and make your device run slower.
Only if smaller than a predefined size. Email attachments can be huge and almost instantly clog up the internal memory of your device. Saying that, the default of 25KB won’t allow you to see many pictures and documents. I set mine to 100KB and this lets the majority of attachments through (including spam).
Yet again, you get to choose which computer you sync with. Calendar gave you the option to sync between multiple computers whereas for email you can only sync with one.
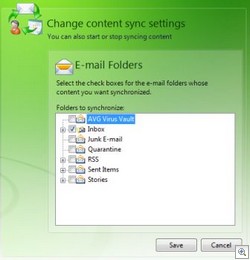
![Email folders]() Select folders to sync lets you choose which folders you want to sync with your device. The default is to only have the Inbox but you can include your whole folder tree on your device, this includes selected folders inside your inbox.
Select folders to sync lets you choose which folders you want to sync with your device. The default is to only have the Inbox but you can include your whole folder tree on your device, this includes selected folders inside your inbox.Something that is particularly useful is the option to add RSS if you have setup Outlook to receive RSS. This can clog up your device but gives you plenty of reading for the the train journey to work.
Tick the boxes you want to sync and press save.
![Filesync]()
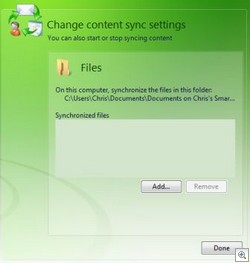
File Sync Settings allows you to synchronise your files from your devices “Documents” folder with a newly created folder in your computers Documents folder titled “Documents on (devicename)”
You can add or remove individual files for syncing. This feature can be useful for keeping particular files on your device, but it is also easy to get carried away with this and fill your devices memory very fast.
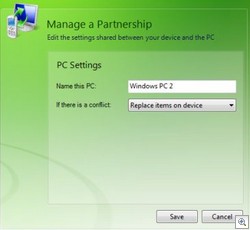
Manage a partnership is the second option in Mobile Device Settings. You can name your PC with something descriptive. This is more useful if you have multiple computers, where you may want to call one Home and the other Work.
If the same file or piece of data has been updated on both your device and your computer since the last sync, it creates a conflict because it doesn’t know which one to use. Multiple contacts with the same name is a common occurrence. Here you get to choose if your device or computer will take precedence.
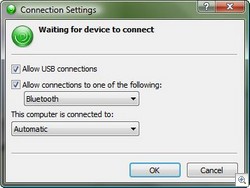
Last but not least is connection settings. This allows you to select how your device will connect to your computer.
Allow USB connections you would generally leave on.
Allow connections to one of the following gives you the option to connect via Bluetooth or Infra Red.
This computer is connected to can generally be left as automatic. The options are “Home” and “Work”. This allows for internet access on your device. Home assumes you are not running through a proxy and work assumes you are going through a proxy. I am guessing automatic will allow for both options.
So that is a complete rundown of all the options and features of Windows Mobile Device Center 6. If you are having trouble connecting your device via Bluetooth or you are getting errors, please read my article “How-to: connect your WM5 device to WMDC via Bluetooth” containing many troubleshooting tips, useful for both USB and Bluetooth connections.
One more thing, you can see the progress of your Sync in the Sync Center. A nice touch.

I hope you have enjoyed this article and found it useful. Please stick around at inspectmygadget.com and read some of my other articles.